- Blog/
How to install ArgoCD on Kubernetes cluster

Table of Contents
Introduction #
Kubernetes became one of the de facto standards for containerized applications. Many cloud platforms from the smallest to the largest like Scaleway, DigitalOcean, AWS, Google Cloud, Azure, and IBM Cloud now provide managed services for Kubernetes. Creating a cluster and deploying an application into it became so easy that it takes a couple of minutes to run your application on it. As these companies abstract the architecture layer from the developer that you do not need to maintain a cluster anymore, deployment of the application became the new main focus. There are many open-source tools that help you to deploy your application on clusters. In my opinion, one of the famous ones is Argo CD. In this tutorial, we will install Argo CD on a cluster, login to UI, and deploy an application with it.
What is Argo CD #
Argo CD is a lightweight and easy to configure declarative GitOps tool. It is built to deploy applications to
Kubernetes. As continuous delivery (CD) has increasing popularity, Argo CD does provide many interesting
capabilities. Unlike other CD tools, Argo CD is lightweight and easy to configure. It is purpose-built to deploy
applications only to Kubernetes, its UI does not have overhead UI tools. It’s also built with a GitOps flow.
Meaning, everything ArgoCD sees as its source of truth is stored in a repository with multiple branches for
different purposes such as canary and production.
Prerequisites #
Before you get started, you will need to have a number of things.
- Kubernetes cluster.
kubectlinstalled. If not, you will need it to manage your clusters.- Have a kubeconfig file (default location is ~/.kube/config).
- Have a GitHub account.
Install Argo CD CLI #
Once you have your cluster set and kubectl installed, let’s install the Argo CD CLI tool. We will install it with
brew for Mac OS, you can find other installation directives on Argo CD
documentation.
brew tap argoproj/tap
brew install argoproj/tap/argocd
Install Argo CD to the cluster #
We need to install Argo CD to our cluster to be able to deploy applications.
kubectl create namespace argocd
kubectl apply -n argocd -f https://raw.githubusercontent.com/argoproj/argo-cd/stable/manifests/install.yaml
This will create a namespace within your cluster and Argo CD services and applications.
Access Argo CD API Server #
By default, Argo CD API server is not exposed to external IP for security reasons. For this tutorial, we will access the server using port forwarding. Kubectl port-forwarding is used to connect to the API server without exposing the service to the outside. We will use the same method for our example application.
kubectl port-forward svc/argocd-server -n argocd 8080:443
This will expose Argo CD service to localhost:8080.
Login to Argo CD in console #
Before we access the Argo CD UI, we need to get and change the admin password. Let’s list all the pods of argocd
namespace.
kubectl get pods -n argocd | grep argocd-server
This will output Argo CD server pod details. The name of the pod is our first password for the admin user. Once you
request to
login, it will ask for username and password. Use admin for username, the pod’s name for the password.
argocd login localhost:8080
Change Argo CD Admin User Password #
Once you logged in, change the password for the admin user with the following command. You will be asked to enter the old password and new password.
argocd account update-password
Login Argo CD UI #
Now, let’s go to localhost:8080 to access the UI.
Create a Github Repository #
As we mentioned in the introduction, Argo CD follows GitOps flow. We will need a repository where we can store our
application manifest files. Let’s create a repository and put the following deployment, service, and argocd application
YAML files into it. For this tutorial, I used example repository.
Deployment #
Create deployment.yaml file with following content.
apiVersion: apps/v1
kind: Deployment
metadata:
  name: echo-deployment
spec:
  replicas: 1
  selector:
    matchLabels:
      app: echo-server
  template:
    metadata:
      labels:
        app: echo-server
    spec:
      containers:
        - name: echo-server
          image: jmalloc/echo-server
          ports:
            - name: http-port
              containerPort: 8080
Service #
Create service.yaml file with following content.
apiVersion: v1
kind: Service
metadata:
  name: echo-server-service
spec:
  ports:
    - name: app
      port: 80
      targetPort: 8080
  selector:
    app: echo-server
Argo CD Application #
Create argocd-app.yaml file with following content.
apiVersion: argoproj.io/v1alpha1
kind: Application
metadata:
  name: echo-server # name of the Argo CD application
  namespace: argocd
spec:
  project: default
  source:
    repoURL: https://github.com/omegion/echo-k8s-app/ # change here with your repository url
    targetRevision: HEAD
    path: kubernetes
    directory:
      recurse: true
  destination:
    server: https://kubernetes.default.svc
    namespace: echo-server # namespace we created
  syncPolicy:
    automated:
      prune: false
      selfHeal: false
After creating these files, push them to the repository. You can change repoURL with the created repository. I used
an example repository for this tutorial.
Deploy Argo CD Application #
Once we have all three files, let’s apply the Argo CD Application YAML file with kubectl.
kubectl apply -f argocd-app.yaml
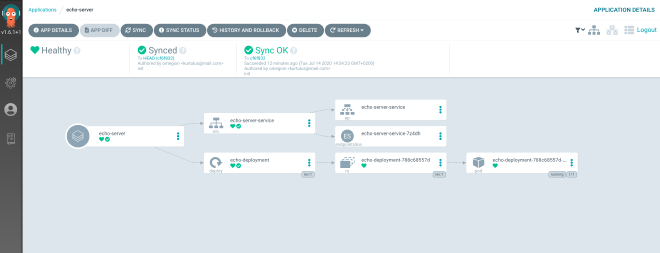
This will create an application in Argo CD UI.
Access Argo CD Application with Port Forward #
In order to access an application from outside in the cluster, we would need an ingress. However, we didn’t create
ingress to access our application from outside in this tutorial. To access our example application, we need to use
port-forwarding as we did for argocd-server.
kubectl port-forward svc/echo-server-service -n echo-server 8001:80
This will create a tunnel between your local port and the application. Visit localhost:8001 on your browser. You will see the request details.
Request served by echo-deployment-788c68557d-72fgl

HTTP/1.1 GET /

Host: localhost:8001
Accept-Language: en-GB,en-US;q=0.9,en;q=0.8,tr;q=0.7
Cache-Control: max-age=0
Upgrade-Insecure-Requests: 1
User-Agent: Mozilla/5.0 (Macintosh; Intel Mac OS X 10_14_6) AppleWebKit/537.36 (KHTML, like Gecko) Chrome/83.0.4103.116 Safari/537.36
Sec-Fetch-User: ?1
Sec-Fetch-Dest: document
Connection: keep-alive
Accept: text/html,application/xhtml+xml,application/xml;q=0.9,image/webp,image/apng,*/*;q=0.8,application/signed-exchange;v=b3;q=0.9
Sec-Fetch-Site: none
Sec-Fetch-Mode: navigate
Accept-Encoding: gzip, deflate, br
Conclusion #
In this tutorial, we installed Argo CD into our existing cluster and created a simple application. Since Argo CD follows GitOps flow, we needed to create a repository from that the Argo CD application can read the manifest files. Finally, we connect to our application with port-forward through application service and test the echo server application.